PreK-Kinder God’s Creation
PreK-Kinder God’s Creation
We are excited to share this visual on Creation! An elder’s wife, Lana Stevenson, created this concept before she passed. But it was a challenge to find stickers that would work. So, once we found that the Silhouette Cameo 4 would allow you to cut your own stickers, then it was just a matter of getting them designed. They take a little bit of work, but hopefully, they will make an impact for your boxes!
• Print the PDF file labeled PREK-KINDER CREATION (BIG) double-sided on cardstock so that the words are on the back of the pictures. Cut. Laminate. Trim. These will be the first 3 days of creation. For Days 4, 5, 6: Print on cardstock. They are labeled PreK-Kinder Day 4—print. Same for days 5 and 6. Do not cut or laminate yet. These 3 pages need to go to the Silhouette to be cut out. Once they are cut, carefully arrange them inside a lamination packet so they stay in position, and then laminate. Trim the outside of the frame. Leave the center of the rectangle as a “window” that holds the creation pieces.
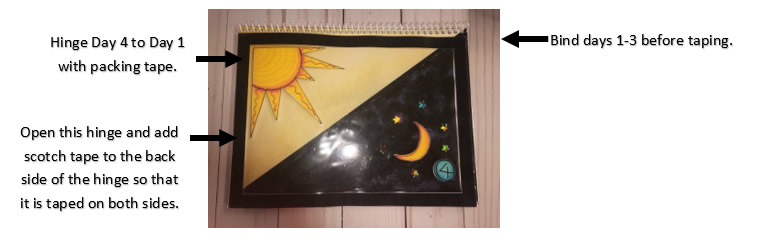
Take Days 1-3 and stack them, punch the top of them, and bind with a coil….(8, 9, or 10mm will work). This needs to be done BEFORE they are taped. Otherwise you may wind up putting unwanted holes in days 4-6. Tape Day 4 to Day 1, Day 5 to Day 2, and Day 6 to Day 3. Add stars (purchased) to day 4. We put clear mailing tape on one side to “hinge” the two sheets together, and then flipped it over and just used clear scotch tape to cover the other side of the “hinge”. I hope you can understand this when you look at the sample we are sending.
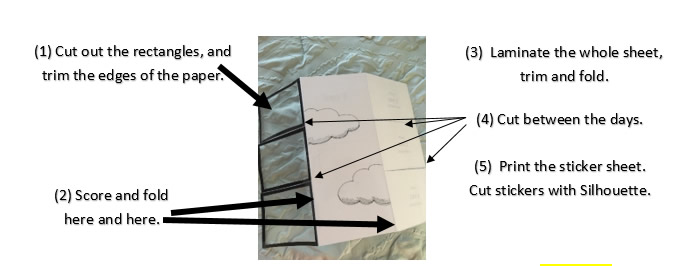
• For the CREATION FOLDER TAKE HOME: Print double-sided on cardstock. Look at the example on the next page. (1) Cut out the rectangles, and trim the edges of the paper. (2) With Day 7 and the clouds facing you, score the 2 vertical lines, and then fold on the score lines, so that the folder is in thirds. When folded, the black rectangles will be the top layer. You may need to trim Days 1-3 so that it will lay flat. (3 ) Laminate the full sheet. Trim edges, then fold it up again. If it will not fold well after lamination, you can “help” it along with an iron on a low setting. (4) Cut on the lines between days 1 and 2, and days 2 and 3. Then cut on the lines between days 4 and 5, and days 5 and 6. We put them in an envelope made by JAM to have a nice way for the kids to store them. .https://www.amazon.com/gp/product/B07X4L75BF/ref=ppx_yo_dt_b_asin_title_o01_s00?ie= UTF8&psc=1
Bind days 1-3 before taping. Hinge Day 4 to Day 1 with packing tape.
Open this hinge and add scotch tape to the back side of the hinge so that it is taped on both sides.
*Score with a ruler and a stylus or a dull knife. Try not to cut the paper at all. You are trying to get a nice bend.
*
(5) The Stickers will be printed on sticker paper. In the file folder, they are labeled: CREATION FOLDER STICKERS—PRINT. Next, send them to the silhouette to be cut out.
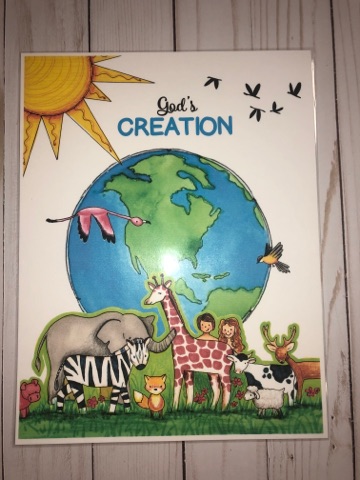
- WORKBOOK. On copy paper, print the pages single sided so that the workbook will be a little fuller. Print the Workbook COVER on cardstock. Laminate the cover and trim. Laminate a blank piece of cardstock for the back cover. Trim. Bind them on the left side…..with probably a 9 or 10 mm coil.
- Print the SENSES STICKER on sticker paper. Send to the Silhouette to make into stickers.
- Print the BIRDS AND FISH ACTIVITY on copy paper, single sided. Cut in half. Staple together at the top.
- Print the ANIMAL MEMORY CARDS on card stock. Cut apart. Put in a baggie. 2 sheets per student.
- There are 2 ACTIVITIES LIST. The one labeled “to share” is for those who are doing their own activities and not doing what we did. So just decide which one fits what you are doing and print that one for the box. Jessica put this on the very bottom of the box underneath everything else .
- Print the BOX LABEL on sticker paper and adhere to the top of the box.
This box is the most time-consuming but oh, so cute!
(1) Cut out the rectangles, and trim the edges of the paper.
(2) Score and fold here and here.
Workbook
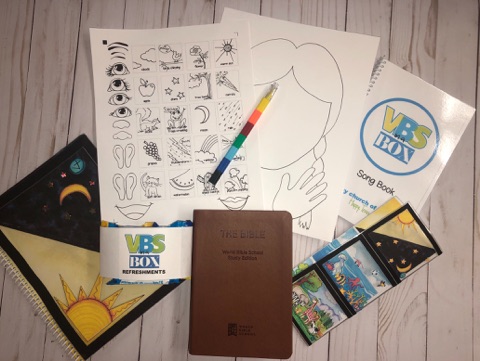
Things included in the preK-Kinder box